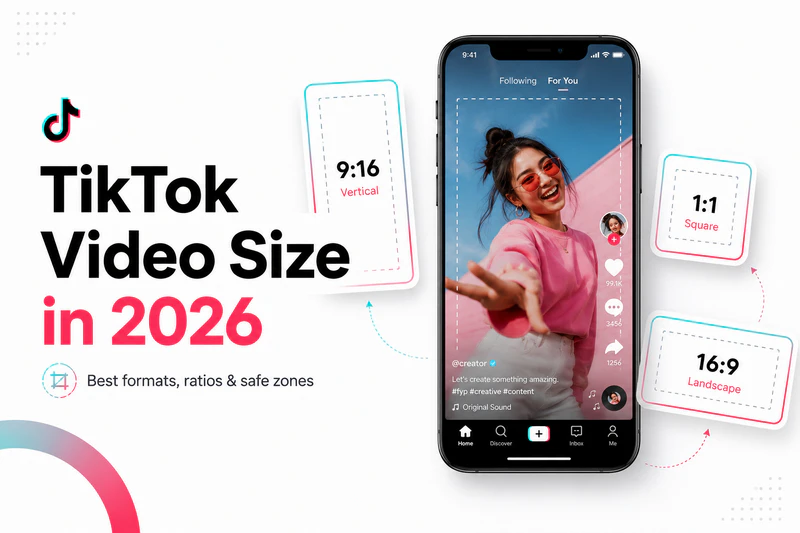
TikTok Video Size in 2026: Best Resolution, Safe Zones & Export Settings Guide
Get your TikTok video size right — dimensions, safe zones, and export specs — before you upload, plus what to do when footage is already soft.
You export a sharp edit, upload to TikTok, open it on your phone — and the hook is sitting behind a button. The footage looks softer than it did five minutes ago in your editor. Nine times out of ten that's a TikTok video size or layout issue — wrong dimensions, off-spec export, or text placed where the UI covers it — not a bad edit.
Below you'll find the TikTok video size specs that still matter in 2026, where to place text and faces so the UI doesn't eat them, how to export without giving away quality, and what to do when you're working from old or soft footage.
Quick Reference: Best TikTok Video Specs (2026)
If you're in a hurry, start here. These are the settings that work for the vast majority of TikTok creators in 2026.
| Setting | Recommended | Why it matters |
|---|---|---|
| Aspect ratio | 9:16 (vertical) | Still the For You default — even with longer uploads and landscape viewing available |
| Resolution | 1080 × 1920 | Sharp on phone screens without oversized files |
| Frame rate | 30 fps or 60 fps | Match your source — don't force conversion |
| Format | MP4 (H.264) | Most reliable codec for TikTok uploads |
| Video bitrate | 8–15 Mbps | Too low = blocky; too high = slow upload, re-compressed anyway |
| Audio codec | AAC | Standard for TikTok MP4 uploads |
| Audio bitrate | 128–192 kbps | 128 for speech; 192 for music-heavy clips |
| Sample rate | 44.1 kHz or 48 kHz | Match your source footage |
The short version: Vertical 1080 × 1920, exported as H.264 MP4 at 8–15 Mbps, with all important content inside the safe zone. Get that right, and most upload headaches disappear.
TikTok Video Size & Aspect Ratio Explained
TikTok is built around the vertical video format — phones held upright, a 9:16 frame taller than it is wide. You can post longer five- to ten-minute pieces now, and there's a landscape player if you're bringing in horizontal clips like podcast cuts or YouTube reposts. But scroll through For You and you'll still see a wall of full-screen vertical video, almost always at 1080 × 1920 pixels. If reach on the main TikTok feed is the goal, that's the frame you should be building for.
Standard TikTok Video Size & Dimensions
Undoubtedly, for most creators in 2026, the target TikTok video size is:
- Width: 1080 pixels
- Height: 1920 pixels
- Ratio: 9:16
Tips: Set your editing timeline first
Do remmember to create your project at 1080 × 1920 (9:16) before you import any clips — not when you're finishing the edit. Resizing as a final step is where aspect-ratio mistakes happen most often. And if you're shooting fresh footage, record vertical at 1080p so your source already matches the timeline.
Other TikTok Video Sizes and Formats
| Format | Dimensions | Best for | Notes |
|---|---|---|---|
| Vertical HD ✓ | 1080 × 1920 | Vlogs, tutorials, talking head, product demos | The default choice for most posts |
| Vertical 4K | 2160 × 3840 | High-end cinematic content | Larger files; TikTok still compresses heavily |
| Square | 1080 × 1080 | Cross-posting from Instagram | Plays on TikTok, but doesn't fill the screen |
| Horizontal | 1920 × 1080 | Gaming clips, screen recordings | Works, but not ideal for main feed content |
How the Wrong TikTok Video Size Breaks Your Layout
Horizontal video (16:9): TikTok may letterbox it with black bars or crop the sides to force a vertical fit. You lose control over what's visible. Important text or action near the edges can get cut off without warning.
Square (1:1) will play, but you're giving up vertical real estate on a feed built for tall video — it tends to feel small and inset compared to everything around it.
Odd ratios like 4:5 are where things get unpredictable. Cropping and padding can vary by device, and what looks centered on one phone may not on another. Hand TikTok the wrong dimensions and the platform decides what stays in frame — not you. That's usually what's behind a TikTok video cropped issue.

TikTok Safe Zones Guide: Templates & Layout Specs
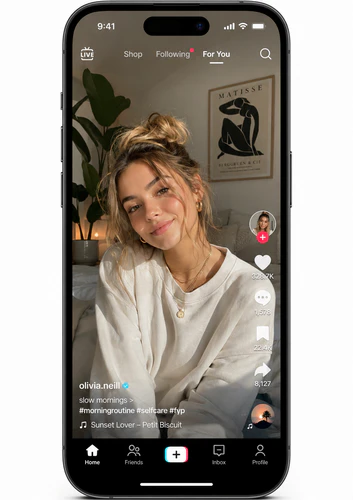
The TikTok safe zone is roughly the center 70% of the frame — the area where your hook, face, and subtitles can sit above the UI without getting covered.
Your video doesn't actually play full-screen — from the first frame, your profile and username sit in the top left, like, comment, bookmark, and share buttons stack along the right edge, and the bottom band holds the caption, sound name, and navigation. Put important content outside that center zone and the UI wins, even when the video file itself is perfectly sharp.
Where TikTok UI sits on your frame
┌─────────────────────────┐
│ [Avatar]     top margin  │  ← avoid hooks & titles here
│                          │
│                          │
│      MAIN SAFE ZONE      │  ← faces, products, key text
│   (center / upper-mid)   │
│                          │
│               [Like]     │  ← keep right edge clear
│               [Comment]  │
│               [Share]    │
│ ──────────────────────── │
│ captions / sound / UI    │  ← subtitles need bottom margin
└─────────────────────────┘
Clear the top-left for profile UI, keep the right edge free of readable content, and treat the bottom 15–20% as caption territory — not subtitle space.
Where to place subtitles, faces, hooks, products, and CTAs
Where to put TikTok subtitles: lower-middle of the frame, about 150–200 px above the bottom on a 1080p export — not on the bottom edge, where the caption bar, sound label, and auto-captions all compete for space.
Faces work best centered or in the upper-center of the safe zone. Top-right gets eaten by the profile area; bottom-right by the button stack. If you're talking to camera, sitting slightly left of center usually keeps your face clear of the right-side controls.
Your hook — the text or visual that has to land in the first second — should sit upper-middle, clear of the profile bubble in the top-left. Products need to be centered in the safe zone; the right third of the frame is basically reserved for TikTok's buttons, so anything with a label you need read shouldn't live there. End CTAs feel natural at the bottom in other formats, but on TikTok that's the most crowded band — center or lower-middle tends to work better.
Most editors now include a safe zone overlay (CapCut, Premiere, DaVinci Resolve). Turn it on for a final review pass — it takes ten seconds and saves you from trusting a 27" monitor when the video will be watched on a 6" phone screen.
5 Common safe zone mistakes
1. Subtitles sitting flush against the bottom edge
Subtitles on the bottom edge look cinematic in the editor, but on TikTok the caption, sound name, and auto-captions pile onto the same strip. Move subtitles to the lower-middle — the bottom third of the safe area, not the bottom of the frame.
2. Hook text placed in the top-left under the profile icon
Hooks placed under the profile icon hide your highest-stakes text in the first second viewers see. Upper-center or center-left is safer; always check on your phone before you publish.
3. Faces framed too wide on the right side
Faces centered in the camera but not in TikTok's layout happen when someone frames for a full-screen preview — the right-side buttons end up covering half a face. Shift the subject left and use the overlay to confirm.
4. Important product details on the right third of the frame
Products held in the right hand often put labels directly under the like button. Center the product or demo middle-left instead. As a rule, treat the right 25% of the frame as off-limits for anything that needs to be read.
5. End-screen CTAs placed too low
Calls to action — "Follow for part 2," "Save this for later," "Drop a 🔥 if you agree" — are routinely placed in the bottom 10–15% of the frame. That's exactly where TikTok's caption, sound info, and navigation elements live.The CTA doesn't fail because the design is bad. It fails because it's invisible.
Move all end-screen CTAs to center or lower-middle of the frame. If you're using animated graphics, preview the animation on your phone to confirm the final resting position isn't in the UI zone.
In addition, if you're using a Reels or Shorts safe zone template, double-check it against TikTok: the button positions aren't identical, and a template built for another platform will steer you wrong.
Why TikTok Videos Look Blurry After Upload?
In most cases, the softness behind a blurry TikTok video after upload comes down to weak source footage, off-spec export, wrong frame dimensions, too many re-exports, or checking the upload before TikTok finishes processing — not a bad edit.
When the result still looks blurrier than your timeline, the instinct is often to crank up resolution or add sharpening — export at 4K "just in case," run the sharpen filter, re-export again. Most of that effort doesn't help, and some of it actively hurts.
Source Quality vs. Export Resolution: Why Upscaling Matters
The source quality matters more than the pixel count on your export: upscaling noisy 480p footage to 1080p just spreads the noise across a bigger canvas — a proper AI video upscale handles that differently than a simple resize. Old phone video, screen recordings, and clips already compressed and re-shared online are especially hard for TikTok's encoder on a second pass — which is why fixing or enhancing before editing tends to work better than hoping the Quick Reference export values will rescue a weak file.
Lighting is the other underrated factor. A well-lit 1080p talking-head clip holds up better than a dark 4K shot where the encoder has to guess at detail in the shadows.
How to Fix Low Quality TikTok Videos Before Uploading
A lot of guides jump straight to export when an upload looks bad. When the issue is soft or degraded source footage, the fix usually happens before your timeline — figure out what's wrong, enhance if you need to, edit carefully, then export once at 1080 × 1920 with H.264 and the right bitrate.
TikTok also tends to treat heavily re-compressed, recycled-looking footage differently in reach — blocky compression, mushy blur, old watermarks, that "third-generation re-upload" look.
Step 1: Identify what's actually wrong
Not every soft clip needs the same fix. Upscaling footage that's already 1080p but poorly lit won't help much; running denoise on a clean clip can make it look worse. Before you run anything through an enhancer, figure out what's actually wrong:
| Problem | What you'll see | Fix direction |
|---|---|---|
| Low resolution | Pixelated edges, blurry text, blocky details | AI upscale to 1080p or 4K |
| Noise / grain | Speckled image, especially in shadows and indoor shots | Denoise processing |
| Soft faces | Smudgy skin, lost eye and hair detail | Face enhancement |
| Shaky camera | Jittery motion, hard-to-read on-screen text | Video stabilization |
| Motion inconsistency | Flickering detail on moving subjects | Multi-frame enhancement |
| Overall flat/blurry look | No single obvious issue — just "bad" | General AI enhancement |
If you're starting from clean 1080p phone video in good light, skip Step 2 and continue from Step 3.
When AI enhancement is worth the effort
Pre-upload enhancement isn't necessary for every post. I usually run this pass for recycled downloaded videos, phone footage with heavy low-light smartphone noise, old archive or storytime clips, screen recordings, webcam or podcast footage, shaky event video, and client footage that came in below spec. It won't save a 200px-wide blocky mess — some sources are too far gone — but for footage that's "almost good enough," fixing it before upload beats trying to rescue it after TikTok's compression.
Step 2: Enhance source footage before you edit
When Step 1 flags low resolution — or any clip you still need to fit the standard TikTok video size — most editors just stretch the pixels on a basic scale-to-fit. Blocky edges and soft detail get worse once TikTok re-encodes. Using a dedicated tool like AVCLabs Video Enhancer AI before you edit ensures the file holds up at 1080 × 1920: it analyzes frames (and in multi-frame mode, sequences of frames) to rebuild detail a timeline resize cannot recover. Noise, soft faces, and shaky motion from the same table have their own models below — match the problem, then enhance once before import.
Free download — preview a few seconds of a recycled downloaded video or low-light smartphone noise clip locally and see whether it clears up before you touch your timeline. No cloud upload, no edit required to test.
Why AVCLabs Video Enhancer AI for TikTok prep
The Step 1 table lists what's wrong and what to run — AVCLabs covers each of those (upscale, denoise, face enhancement, stabilization, multi-frame). Two advantages worth calling out for TikTok workflows specifically:
- Local GPU processing — runs on your Windows or Mac with no cloud upload; useful for long clips and private content
- Batch processing — enhances multiple files in one session when you're prepping a week's worth of edits
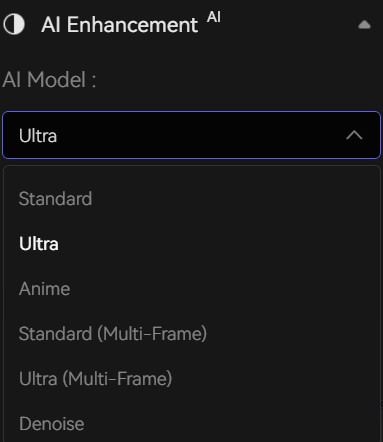
Choosing the right model
AVCLabs offers several models, and choosing the right one saves time on the render and keeps you from over-processing clean footage:
- Standard / Ultra — covers most general use cases; Ultra asks more of your GPU (4GB+ VRAM recommended)
- Denoise — best for low-light smartphone noise, grainy night footage, or old indoor clips — similar to a dedicated video denoise pass
- Face Enhancement — talking-head content, reactions, and to-camera tutorials where viewers are looking at your face first
- Anime — cartoon and anime footage; upscales or cleans low-res animation without softening line art — use for manga-style edits, anime memes, and re-shared cartoon clips
- Standard / Ultra Multi-Frame — dance clips, walk-and-talk, and B-roll with motion; single-frame processing can flicker on moving subjects
Match the model to the problem from Step 1 — preview a few seconds before committing to a full render.
Step 3: Edit without undoing your enhancement
This happens more often than you'd think. A creator enhances footage beautifully, then:
- Adds heavy sharpening on top — creating halos and crunch after compression
- Re-exports the same clip three times with different effects — losing a generation each time
- Reframes or stretches footage at the last minute — distorting subjects you already enhanced instead of cropping properly in the timeline
Use the AVCLabs output as your new master file — edit from there without extra sharpening or reframing.

Step 4: Export without losing quality
Your timeline should already be 1080 × 1920 (9:16) — check your export preset, tune bitrate for motion, and export once.
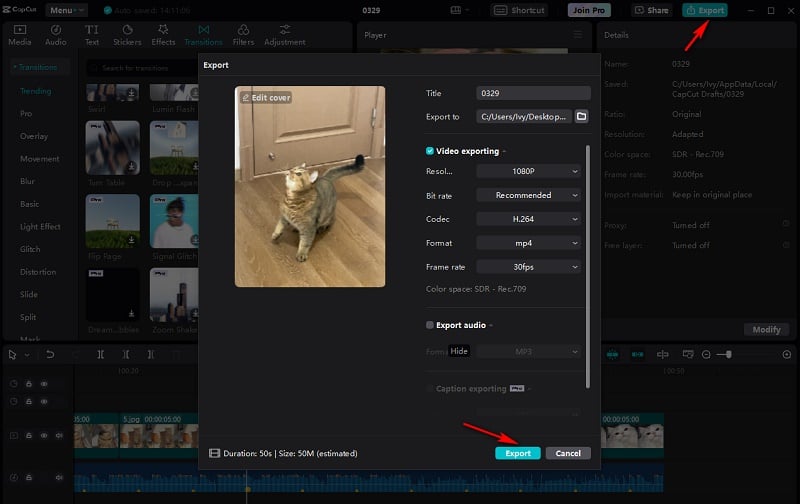
Match your export preset to Quick Reference
Open your editor's export dialog and verify every value against the Quick Reference table — don't export from memory. Save a dedicated TikTok preset once you've confirmed the numbers.
One field many presets omit: Rec.709 color space. Mismatches there can make your upload look darker than your timeline after TikTok re-encodes.
Tune bitrate for motion
Stay within 8–15 Mbps, but pick a point inside that range based on how much movement is in the clip — 8–10 Mbps for static talking-head shots, 12–15 Mbps for dance, sports, and fast cuts. When you're unsure, aim for 12–15 Mbps; motion-heavy content shows starved bitrate faster than slow footage.
Export mistakes to avoid
- Uses a low-bitrate export preset — removes the improvement you just paid for in processing time
- Converting 30 fps footage to 60 fps in the export settings — invents frames and bloats the file without helping TikTok playback
- Checking the upload immediately after posting — you may be seeing a low-bitrate preview; wait a few minutes before you decide it failed
- Reusing a YouTube or Reels export preset — build a dedicated TikTok preset once and reuse it
Export once, then upload. If you ran footage through AVCLabs, treat that enhanced file as your master — don't enhance the final export a second time.
TikTok Upload Quality Checklist (2026 Creator Workflow)
You've done the heavy lifting — timeline set, footage enhanced, export dialed in. The last stretch before upload is where small things still bite: a hook sitting under the profile icon, subtitles lost behind the sound label, judging quality on your laptop instead of your phone. Work through this checklist once before you hit publish. It catches what you forget when you're ready to post.
Before editing: Source and setup
- Source footage reviewed — watched at full screen; problems identified before editing starts
- Enhancement applied if needed — low-res, grainy, or old clips processed through AI enhancer (e.g., AVCLabs) before import into editor
- Correct model selected — denoise for grain, face enhancement for talking head, multi-frame for motion
- Editing timeline set to Quick Reference specs — before any clips are imported
- Frame rate matches source footage — no unnecessary 30→60 fps conversion
During editing: Content and layout
- Opening hook placed in upper-center safe zone — not top-left under profile icon
- Face framed in center or center-left — clear of right-side button stack
- Subtitles in lower-middle zone — at least 150–200 px above bottom edge
- Product and demo action centered — key details not on right third of frame
- End-screen CTA above bottom UI area — not in the bottom 15% of frame
- Safe zone overlay enabled during final review pass
- No unnecessary sharpening or heavy softening filters applied
- Audio levels checked — voice clear, music not overpowering speech
Export: Technical settings
- Export preset verified against Quick Reference — checked in the export dialog, not from memory
- Color space: Rec.709
- Bitrate tuned for motion — within Quick Reference range; see Step 4
- Single final export — no multi-pass re-export loops
- Custom TikTok preset saved in editor for future use
- Quick local playback check on phone before upload
Upload: Platform and verification
- Stable Wi-Fi or strong connection for upload
- Upload completed without interruption
- Waited 2–5 minutes for TikTok processing to finish
- Reviewed on phone — not desktop browser — for true feed appearance
- Final check: text readable? Face visible? Motion clean? Audio clear?
FAQs about TikTok Video Size
What's the maximum file size and video length TikTok allows?
Most accounts can post up to 10 minutes. The file-size cap depends on region and account type — TikTok doesn't publish one global limit — but a few minutes of normal 1080p footage rarely comes close. If uploads keep failing, try stable Wi-Fi first; a dropped connection mid-transfer often looks like a size error when it isn't.
Why is my TikTok video cropped or cut off after upload?
A TikTok video cropped issue usually traces to the wrong aspect ratio — not a failed export. Send TikTok 16:9, 1:1, or 4:5 footage and the platform letterboxes, pads, or crops the edges to force a vertical fit; you lose control over what stays in frame. Build at 1080 × 1920 (9:16) in your timeline before you edit.
Why do my hook or subtitles disappear on TikTok?
That's a safe zone layout problem, not a resolution issue. Profile icons, side buttons, and caption bars sit on top of your video from the first frame — put hooks, faces, or subtitles outside the center area and the UI covers them even when the file is sharp 1080p. Turn on a TikTok safe zone overlay and confirm placement on your phone before you publish.
Should I publish from the TikTok app or upload from a computer?
Either works — TikTok encodes the file you send, not the device you upload from. Desktop upload suits finished edits from Premiere or CapCut; in-app is fine for camera-roll clips. Export quality matters; upload path doesn't.
Why does re-uploading a downloaded TikTok make quality worse?
Every download is already a compressed copy — often with a platform watermark baked in. Uploading that file runs a second encode on weaker source material. Go back to your original export or project file — not a save-from-TikTok version.
Does uploading in 4K improve TikTok quality?
Usually no — TikTok re-encodes on ingest, and most For You playback is served around 1080p anyway. A 2160 × 3840 upload means a heavier transfer and longer processing for little visible gain on a phone feed. Use 4K only if you're keeping a master archive, not to fix a soft upload.
Can I trust CapCut's one-click TikTok export preset?
It's a reasonable shortcut, but one-click hides what you're actually sending. Some CapCut builds still default to lower bitrates or unnecessary frame-rate conversion — open advanced settings before you rely on it. Our CapCut export quality guide lists the fields worth checking; save your own preset once you've confirmed them.
Conclusion
Most TikTok quality problems come down to the same handful of decisions: match the Quick Reference specs, keep important content inside the safe zones, export once, and fix soft footage before it ever hits your timeline. For broader editing habits beyond upload specs, see our video editing tips for beginners. The specs aren't complicated — it's the order you apply them in that trips people up. Get that workflow consistent and uploads tend to look the way they did in your editor.
Got archive footage or a re-download that doesn't quite hit 1080p? Run a quick preview before your next edit — it takes less time than re-exporting twice and hoping TikTok plays nice.
Free download — upscale and denoise soft clips to clean 1080p before you edit. Preview locally, no cloud upload required.
See what AVCLabs Video Enhancer AI can fix before you upload →

Emma Dan
She is a video post-production specialist and AI tool reviewer who has helped thousands of creators streamline their editing workflows through practical, no-fluff tutorials. Her work focuses on comparing AI video tools and breaking down real editing workflows for creators.