



How to Fix Pixelated Videos: Causes, Solutions, and Step-by-Step Guide
Learn how to fix pixelated videos with effective methods and tools. Discover the causes of video pixelation and fix blurry, blocky footage with AI enhancers, editors, and more.
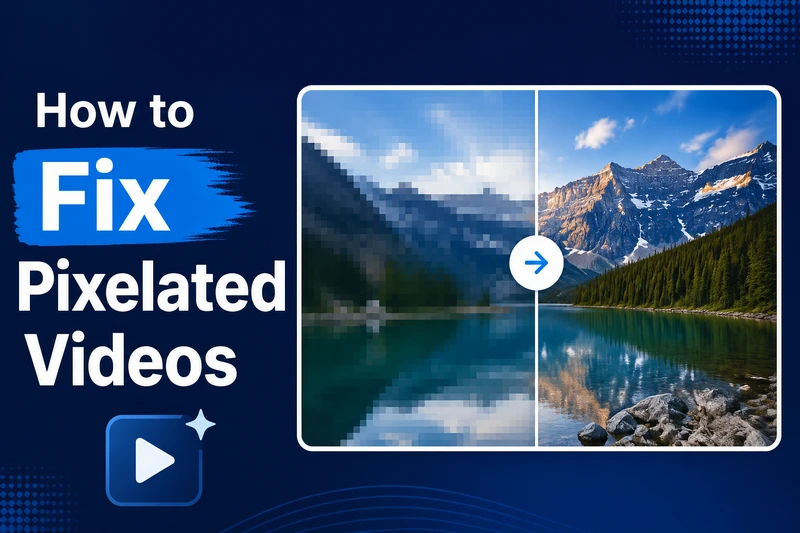
Whether caused by low resolution, excessive compression, low bitrate, file corruption or playback issues, video pixelation can severely affect viewing quality and may even render important video footage unusable. Fortunately, pixelated videos can often be improved or repaired with the right tools and techniques.
Part 1: What Causes Pixelated Videos? 9 Common Reasons Behind Video Pixelation
1. Low Resolution Video
This is one of the most common causes of pixelated videos. If the source video is a low-resolution video (such as 240p or 360p), and you enlarge it directly up to 1080p or 4K, pixelation and blurry edges may occur due to a lack of source pixels.
🔥 Read More: 480P to 1080P Video Converter: How to Convert Videos from 480P to 1080P
2. Over Compression
Sometimes, in order to reduce the file size, videos are overly compressed. For instance, repeated exports can lead to permanent loss of video quality data. In fast-moving scenes, blurry details and blocky artifacts are particularly likely to occur.
3. Low Bitrate
The bitrate determines the amount of visual data stored per second. When the bitrate is set too low (for example, if the encoding bitrate for a 1080p video is below 5 Mbps), the encoder is forced to discard fine details from the video in order to control the file size. This loss of information results in obvious compression artifacts.
4. Incorrect Encoding Settings
When exporting a video, incorrect export settings-such as a low bitrate, an inappropriate GOP setting, or the use of a low-specification H.264 encoder—will result in the video appearing pixelated on all players and devices.
5. Corrupted Video Files
Corrupted video files are also one of the causes of pixelation. For example, incomplete downloads, interrupted transfers or damaged storage media can all lead to the loss of some frame data, resulting in abnormal display, stuttering or pixelation.
6. Codec Compatibility & Playback Issues
Sometimes, even if the original file is not corrupted, the video may appear pixelated during playback. Common causes include: The player lacks the corresponding decoder (such as HEVC/H.265), the player version is outdated, conflicts with GPU hardware decoding, out-of-date graphics card drivers, or lack of hardware support.
7. Poor Lighting Conditions
When shooting in low-light conditions, the camera increases the ISO, resulting in increased noise and pixelation, which makes the video appear grainy.
8. Insufficient Network Bandwidth
If the internet connection is too slow during online streaming, the platform automatically reduces the bitrate to ensure smooth playback, resulting in a blurry video.
9. Unstable Hardware Connections
If your HDMI or DP cable is loose, outdated, or damaged, it will be unable to handle high-bandwidth video signals (such as 4K resolution), resulting in signal interference that causes flickering, color artifacts, or temporary pixelation.
Part 2: Use AVCLabs Video Enhancer AI to Fix Slightly Pixelated or Blurry Videos
AVCLabs Video Enhancer AI is an AI-driven professional-level video enhancement and restoration software specifically designed to fix pixelation, blurring, compression artifacts, and low-resolution videos. It utilizes a deep learning super-resolution model to reconstruct missing details instead of simply stretching pixels. While intelligently enhancing the missing details, it retains natural texture and quality, and is capable of eliminating blocky artifacts and reducing noise.
It can effectively address the video pixelation caused by low resolution, excessive compression or low bitrates. Whether dealing with old low-resolution footages, heavily compressed videos, or blurry recordings, AVCLabs Video Enhancer AI can upscale video to a higher resolution, reduce compression artifacts and enhance visual details.
How to Fix Pixelated Videos with AVCLabs Video Enhancer AI?
Step 1: Import Your Pixelated Video
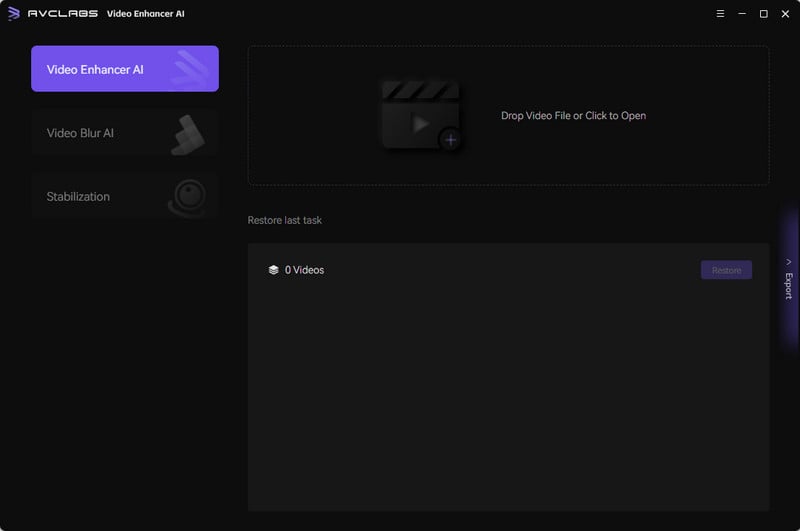
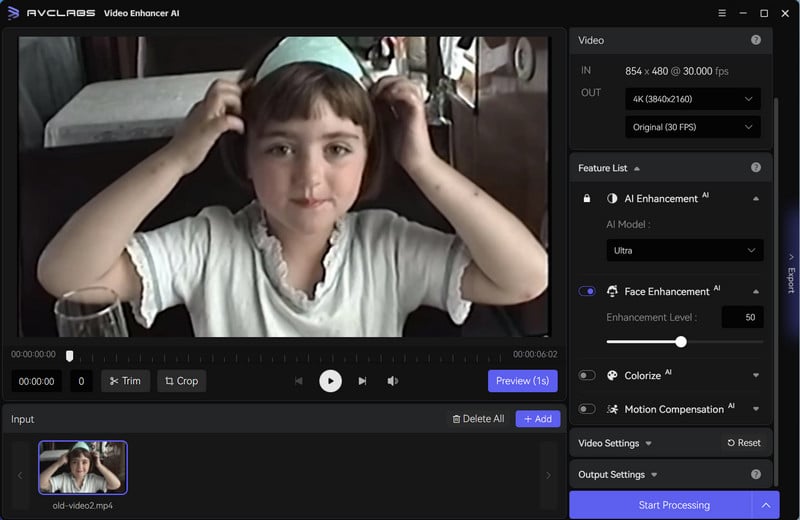
Download and install AVCLabs Video Enhancer AI, then launch the program. Click to open or simply drag and drop the pixelated video into AVCLabs Video Enhancer AI.
Step 2: Select AI Enhancement Model
Choose the appropriate AI model based on the video quality and your specific needs.
For pixelated or blurry videos, the following options are recommended:
- Standard Model: Improves overall video quality and enhances details.
- Ultra Model: Designed for high-quality upscaling and detailed restoration.
- Denoise Model: Reduces noise and grain in low-quality footage.
If the video contains clearly recognisable people, please ensure that Face Enhancement is enabled.
Step 3: Adjust Output Settings
Select your desired output resolution (e.g., 1080P, 4K, or 8K) under "Video Out." Adjust parameters such as brightness, saturation, contrast, sharpness, and noise reduction according to the video situation. You can also adjust the output settings such as video format, encoder and bitrate before exporting.
Step 4: Preview and Export the Enhanced Video
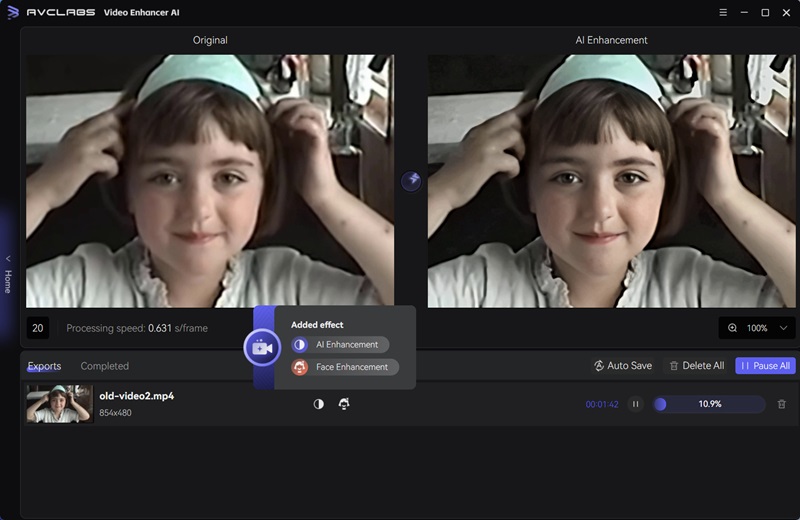
Use the preview feature to compare the original video with the enhanced version. If the result meets your expectations, click Export to start rendering video.
Once processing is complete, the enhanced video will be sharper, with reduced pixelation and superior detail retention.
Part 3: Use Adobe Premiere Pro to Fix Pixelated Videos
Adobe Premiere Pro is a professional video editing software that offers a variety of tools to enhance video quality. For low-resolution footage, you can employ the built-in "Detail-Preserving Upscale" effect or third-party AI plugins (such as ScaleUp) to intelligently upscale the video and recover lost pixel detail. To address blocking artifacts and blurriness caused by excessive compression or low bitrates, AI enhancement features or professional noise reduction plugins like Neat Video can effectively minimize compression artifacts and improve video clarity. For high-ISO noise and grain resulting from poor shooting conditions, the built-in noise reduction effects can significantly improve the visual quality of the footage.
🔥 Read More: How to Upscale Video to 1080P, 4K in Premiere Pro
How to Fix Pixelated Videos with Adobe Premiere Pro?
Step 1: Open the Pixelated Video
Open Adobe Premiere Pro, create a new project and add your media.
Step 2: Remove Pixels from Video
Go to the "Effects" panel and apply the Unsharp Mask effect to improve visual clarity and restore the edge contours of slightly blurred or compressed videos. Carefully adjust the parameters such as Amount, Radius, and Threshold to enhance details without magnifying noise or compressing artifacts.
Step 3: Export Using High-Quality Settings
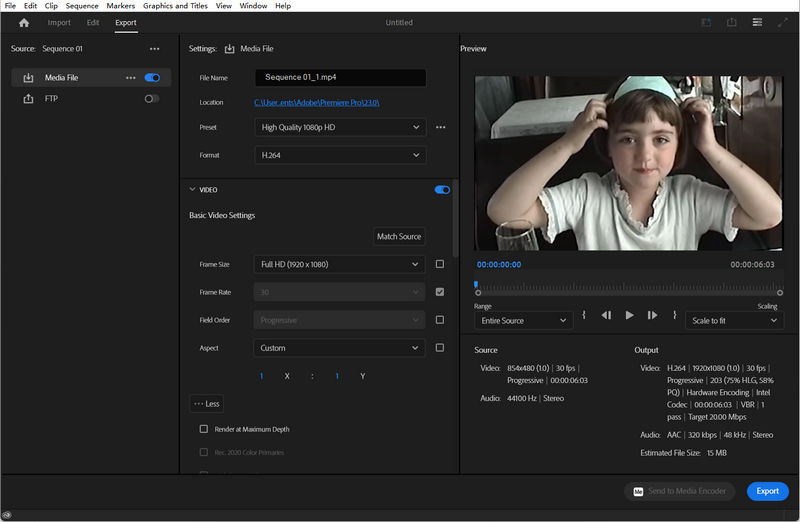
To export the video, click File and Export, then select Media. Choose your desired format, resolution, and other settings.
- Format: H.264
- Preset: High Quality 1080p HD/ High Quality 2160p 4K
- Bitrate Encoding: VBR, 2 Pass
- Bitrate: Recommended 15–20 Mbps for 1080p video
Part 4: Use VLC Media Player to Fix Blocky or Pixelated Videos
VLC Media Player is more than just a media player. It features a range of built-in video filters that can optimize blocky or pixelated video footage in real time during playback. It can eliminate mosaic-like artifacts by rearranging pixels with the Deblocking filter, soften the video and reduce graininess using the Denoiser filter, or enhance object edges for a clearer picture with the Sharpen filter.
How to Fix Pixelated Videos with VLC Media Player?
Step 1: Load Your Video
Launch VLC and open the pixelated video you want to improve.
Step 2: Enable Video Effects
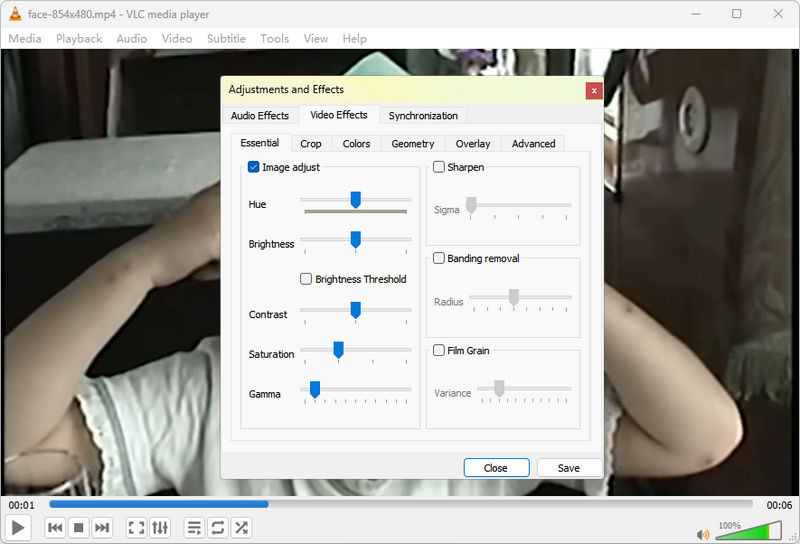
On the top menu bar, click on Tools and select Effects and Filters. Under the "Essential" tab, enable and adjust the Sharpen filter to enhance edges and improve the visual clarity of blurry or compressed videos. VLC also includes a noise reduction filter under "Advanced" that can reduce noise and graininess in low-quality videos.
Step 3: Save the Settings
After applying the settings, you can play the video again to compare the visual results, then click the "Close" button at the bottom.
Part 5: Use Untrunc to Repair Corrupted Pixelated Videos
Untrunc is a free and open-source video restoration tool designed specifically for restoring damaged or truncated video files in formats such as MP4, M4V, MOV, 3GP, etc.
It analyzes the encoding format and layout of normal video segments and compares them with the damaged files. It then re-integrates the missing metadata back to its original position. By reconstructing the file structure, it enables media players to correctly read and display video frames once again, thereby fixing pixelated videos caused by file corruption.
How to Fix Pixelated Videos with Untrunc?
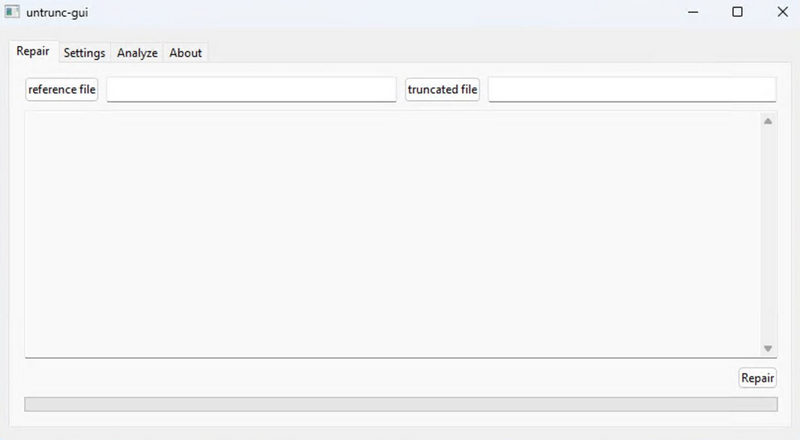
Step 1: Launch Untrunc GUI
Download the latest version of Untrunc (including the GUI, suitable for users unfamiliar with the command line) from the GitHub Releases page. Extract the files and launch untrunc-gui.exe.
Step 2: Add Reference and Truncated File
On the "Repair" tab, click "Reference File" to select the uncorrupted video and click "Truncated File" to select the corrupted video that need to be repaired. It is required that both of videos come from the same device.
Step 3: Fix Corrupted Pixelated Video
Click the Repair button to start fixing the pixelated video. Once complete, a new file named `[original filename]_fixed.mp4` will be created in the same directory.
Part 6: Use PotPlayer to Fix Playback Pixelation
PotPlayer is a free, all-in-one multimedia player and one of the most powerful media players available on Windows. Standard players such as Windows Media Player often struggle to handle modern video formats such as H.265 (HEVC), AV1 or 10-bit HDR, resulting in frame drops and severe pixelation. PotPlayer features an independent decoding system and customizable hardware acceleration settings, allowing it to handle these high-spec formats with ease and fix pixelation issues caused by outdated graphics drivers or GPU conflicts.
How to Fix Pixelated Videos with PotPlayer?
Step 1: Open Your Video in PotPlayer
Download and install PotPlayer, and then open the pixelated video. If the video plays smoothly and clearly in PotPlayer but appears pixelated in other players, the problem is most likely caused by the playback environment (such as missing codecs, an outdated player or hardware acceleration conflicts), rather than the video file itself.
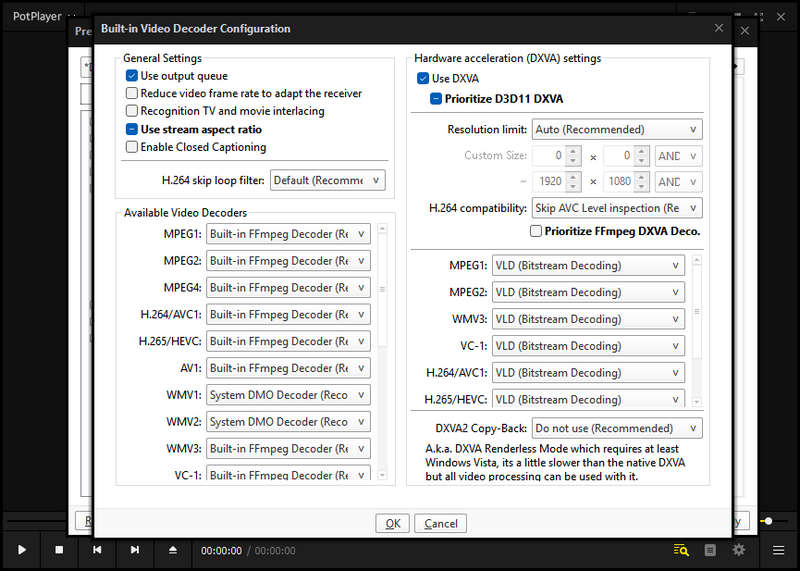
Step 2: Switch Hardware Decoding Settings
Right-click → select 'Reference' → Navigate to 'Filter Control' and 'Video Decoder' → Click the 'Built-in Video Codec/DXVA Settings' button → Uncheck "Use DXVA".
The system will then rely on the CPU to render the image correctly, thereby immediately resolving any mosaic or screen distortion issues caused by the GPU.
Step 3: Change the Video Renderer
If software decoding does not resolve the issue, the problem may lie with the video renderer. Right-click → 'Video', and in the 'Video Renderer' drop-down menu, switch to 'Built-in Direct3D 11 Video Renderer'.
It offers high-precision texture scaling and accurate color space mapping, which can eliminate jagged edges and mosaic artifacts.
Part 7: Use HandBrake to Fix Low-Bitrate Pixelated Videos by Re-encoding
HandBrake is a free, open-source video transcoder compatible with Windows, macOS, and Linux. Unlike those AI video depixelators that enhance video quality by reconstructing missing details, HandBrake fixes pixelated videos by optimizing the encoding process.
By re-encoding using a higher bitrate (15–20 Mbps is typically recommended for 1080p video), a higher-quality encoding preset and appropriate export settings, HandBrake can restore video clarity and significantly reduce pixelation.
How to Fix Pixelated Videos with HandBrake?
Step 1: Import Your Video
Download and install HandBrake, then launch the program. Click on "File" to add files or simply drag the pixelated videos into HandBrake.
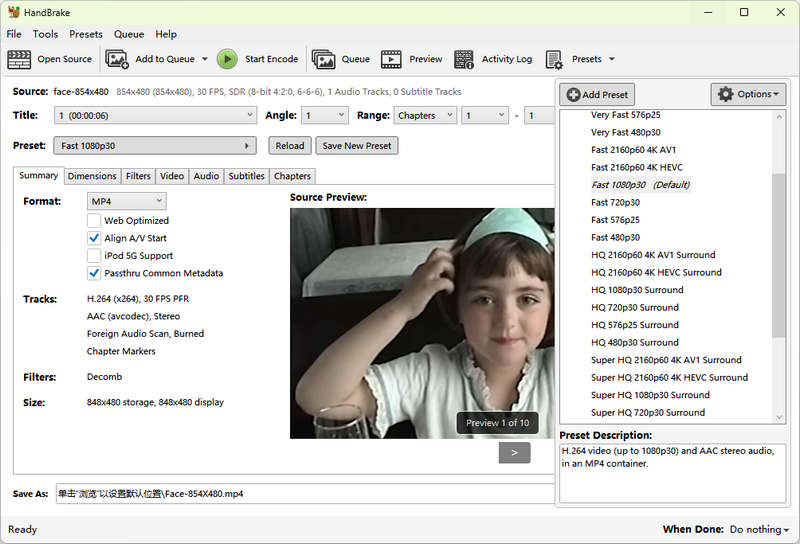
Step 2: Choose a High-Quality Preset
Click "Preset" at the top of the interface. From the drop-down menu, select the appropriate high-quality preset based on your video resolution, for example:
- Select HQ 1080p30 Surround for Full HD video
- Select HQ 720p30 Surround for HD video
These presets automatically apply optimized encoding settings to maintain superior video quality and minimize additional compression artifacts during re-encoding.
Step 3: Adjust Video Settings
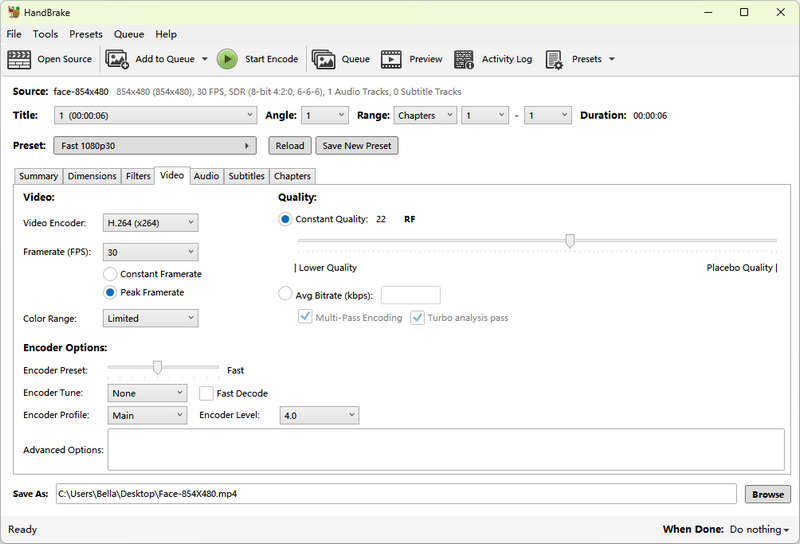
Switch to the "Video" tab and optimize encoding settings.
- Video Encoder: H.264 (x264) or H.265 (x265)
- Framerate: Same as source
- Constant Quality: An RF value of 18–22 is generally the ideal range for high-quality output
- Avg Bitrate: If the source video exhibits severe compression artifacts, switch from "Constant Quality" mode to "Avg Bitrate" and increase the bitrate
FAQs About How to Fix Pixelated Video
How can I make a blurry video look clear?
You can enhance the resolution, reduce noise and enhance details using video enhancement tools, making blurry videos appear clearer. AI-driven tools such as AVCLabs Video Enhancer AI can increase video resolution and improve clarity, while editing software like Premiere Pro can apply sharpening and noise reduction effects.
Why is 1080p so pixelated?
A 1080p video can still look pixelated if it has a low bitrate, excessive compression, poor export settings, or playback compatibility issues. For example, a 1080p video with a bitrate lower than 5 Mbps will lose details and produce blocky artifacts.
How to fix a pixelated video for free?
You can improve a blurry video for free using tools like VLC or free video editors, but heavily blurred videos usually cannot recover lost details. AI enhancement tools can provide better results by analyzing frames and enhancing missing details, such as AVCLabs Free Online Video Depixelizer.
Final Thoughts
For videos with low resolution, blurry images or compression artifacts, AI enhancement tools like AVCLabs Video Enhancer AI can help improve resolution and restore image details. If the problem stems from improper encoding settings, tools like HandBrake can optimize video parameters by re-encoding. For issues such as mosaics or poor image quality during playback, VLC Media Player and PotPlayer can help resolve codec conflicts, while tools like Untrunc are suitable for repairing damaged video files.

Upscale, denoise, and restore pixelated video locally with AI — monthly plans available, or lifetime from $149.90 on recent promo.

Emma Dan
She is a video post-production specialist and AI tool reviewer who has helped thousands of creators streamline their editing workflows through practical, no-fluff tutorials. Her work focuses on comparing AI video tools and breaking down real editing workflows for creators.


 Eve Williams
 May 13, 2026