How to Blur Background in Lightroom [the Latest Version]
Background blurring is one technique that can significantly enhance the aesthetics of your photos. Also known as shallow depth of field, this effect draws attention to the subject by gently blurring out the background, creating a pleasing separation between the two. While achieving this effect in-camera is preferred, you can also accomplish it in post-processing.
So many people express interest in learning how to blur the background in Lightroom. This article not only guides you through the steps of blurring backgrounds using Lightroom, but it also covers achieving the background blurring effect while capturing the image in-camera. Additionally, it will present simpler methods to blur backgrounds in both images and videos.
- Part 1: How to Blur Background while Capturing the Image
- Part 2: How to Blur Background in Lightroom
- Part 3: Alternative Way to Blur Image Background with AI
- Bonus: How to Blur Video Background with AI
1. How to Blur Background in Lightroom Using AI Background Mask
2. How to Blur Background in Lightroom on Mobile
3. Limitations of Blur Background in Lightroom
1. How to Blur Image Background with AVCLabs PhotoPro AI
2. Video Tutorial: Blur Image Background with AVCLabs PhotoPro AI
Part 1: Blur Background while Capturing the Image — Understanding the Depth of Field
To achieve a background blurring effect in-camera, you have to first understand the depth of field. Depth of field refers to the area in your photo that's in focus, while the rest gradually becomes blurred. To achieve a pleasing background blur, you need to grasp the factors that influence depth of field: aperture, focal length, and distance from the subject. A wider aperture (lower f-number) results in a shallower depth of field, resulting in pronounced background blur, while a longer focal length and closer subject distance can also contribute to a blurrier background.
Part 2: How to Blur Background in Lightroom — The Easiest Way with the Latest Version
Dose Lightroom have a blur feature? After all, most people tend to think of it as more of a Photoshop function. While Lightroom doesn't have a dedicated "blur" tool, you can use the clarity and sharpness slider to create a blur-like effect. And there are multiple tools you can use to touch up the background blurring effect in Lightroom like the following:
Adjustment Brush: The adjustment brush tool enables you to brush over specific areas of your image and apply various adjustments, including blur. This can be useful for selectively blurring certain parts of the background.
Graduated Filter: The graduated filter allows you to apply adjustments to specific areas of your photo. By using this tool, you can create a gradient of blur that gradually blurs out the background while keeping the subject sharp.
Radial Filter: The radial filter lets you create a circular or oval-shaped selection that you can then adjust separately from the rest of the image. You can use this tool to enhance the background blur around the subject.
2.1 Detailed Steps to Blur Background in Lightroom Using AI Background Mask
Step 1: Import a Photo
In Lightroom, you should import your images into the library instead of just opening them as you do in other programs. You can do this by clicking the "File" and choosing import photos and videos.
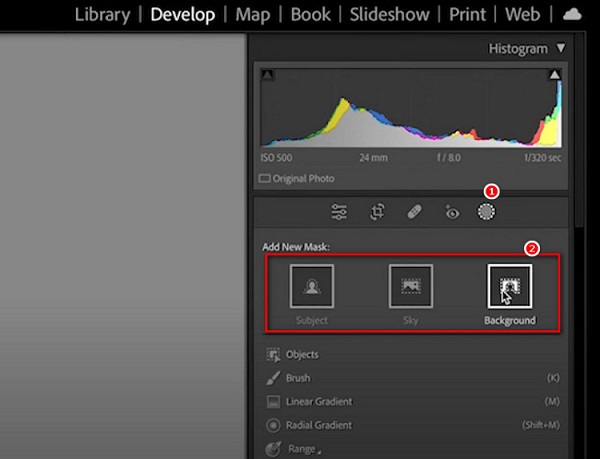
Step 2: Select the Background Using AI Background Mask
If you search for related tutorials, you will find that the adjustment brush tool was frequently used to create new masking. This requires you to manually paint areas that need to be edited independently. But now you can use AI to pick out backgrounds, subjects, skies, and objects. Go to the "Develop" page and press the "Masking" icon on the right. Then, pick "Background." Lightroom will automatically choose and cover the background.
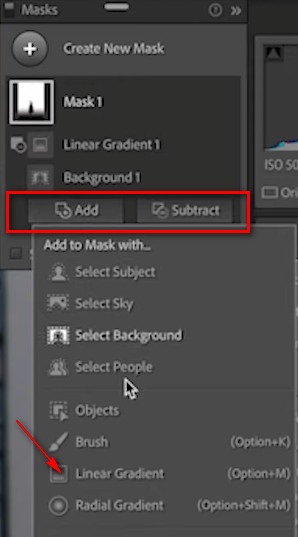
Step 3: Fine-tune the Background Selection with Brush Tool
Sometimes, the AI doesn't work perfectly, and some parts might not be selected or might be covered too much. In this case, click the Add and use tools like the Brush for more precise control to expand your selection, or click Subtract to erase the area with any tools under this drop-down menu.
Tips: Achieve More Realistic Blur Effect (Optional)
If you just add a single mask for the entire blur, it might not look very good. Instead, you can make it look more real by adding a linear gradient at the bottom or adding the Radial Gradient so the blur transition into more intensity as the photo goes further into the background.
Step 4: Apply the Blur Effect
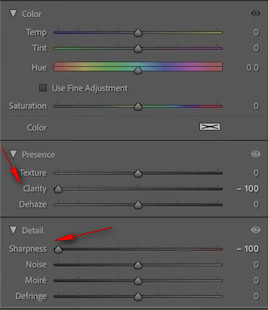
Here you can add blur effects with two sliders: Clarity and Sharpness. Go to the Presence section and drag the Clarity slider down, it will soften the background detail. Then go to the Detail section and drag the Sharpness slider down. You can also adjust other parameters to get the effect that you like.
2.2 How to Blur Background in Lightroom on Mobile
Blurring the background in Lightroom, whether on your computer or mobile device, follows similar steps. However, we'll introduce you to a slightly different approach in this part that also works on the desktop version.
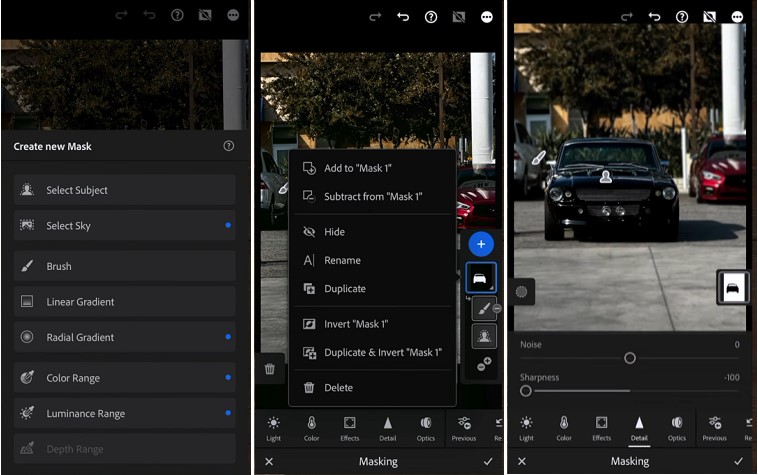
Step 1: Hit the "+" button to create the mask and then select the Subject. It will automatically detect and cover the subject in the photo. But as stated before, AI may not always produce perfect results.
Step 2: To refine the mask, type "Add to Mask 1" to include any missed areas. Conversely, use "Subtract from Mask 1" to erase portions you don't want. Utilize the brush tool for this purpose. Once this is done, select the Mask and Invert it to the background.
Step 3: Navigate to the "Detail" section and manipulate the Sharpening slider. Drag it down to blur the background effectively.
Step 4: For the final touch, adjust the mask brush size to slightly increase it. Use this modified brush to remove some of the blur leading up to the subject. This added detail will enhance the overall realism of the image.
2.3 Limitations of Blurring Background with Lightroom
Although blurring the background with Lightroom is much easier because of the updated AI function, there are some limitations.
Edge Precision: Creating flawless selections around intricate details such as hair or other complex elements can be challenging in Lightroom. In situations where you have a highly specific or detailed edge that requires a nuanced blur treatment, opting for Photoshop might be the more suitable choice.
Realism: Lightroom's background blur tools can simulate the effect of shallow depth of field to a certain extent, but they might not achieve the same level of realism as the effect in-camera with a wide-aperture lens. Its blur tools might not perfectly replicate the complex optical characteristics of a camera lens.
Limited Subject Control: While you can effectively blur the background, Lightroom's tools might not provide the same level of control over the subject as a dedicated portrait retouching tool. This could impact the overall quality of the final image.
Learning Curve: Effective use of Lightroom's background blurring tools requires a learning curve. Beginners might find it challenging to achieve the desired effect without prior knowledge of the software's features and settings.
Part 3: Alternative Way to Blur Image Background with Dedicated AI Image Editor
AVCLabs PhotoPro AI is a powerful yet easy-to-use automatic AI editor and enhancer that helps to enhance low-quality images, upscale photos without losing quality, adjust image color, erase and replace objects from the image,colorize black-and-white photos, cutout images, and blur the image background.
The preset AI features greatly simplify the photo editing process, making it suitable for anyone including beginners. In addition to using advanced AI technology, AVCLabs PhotoPro AI also offers useful editing tools that both retain the editor's freedom of control over the photo and increase efficiency.
Key Features of AVCLabs PhotoPro AI
- Blur the image bakcground with a few clicks
- AI erase and replace objects with a text prompt
- Enhance photo quality with advanced technology
- Upscale photos up to 3x, 4x without losing quality
- Remove unwanted objects, people, watermarks
- Colorize B&W photos to make it come to life again
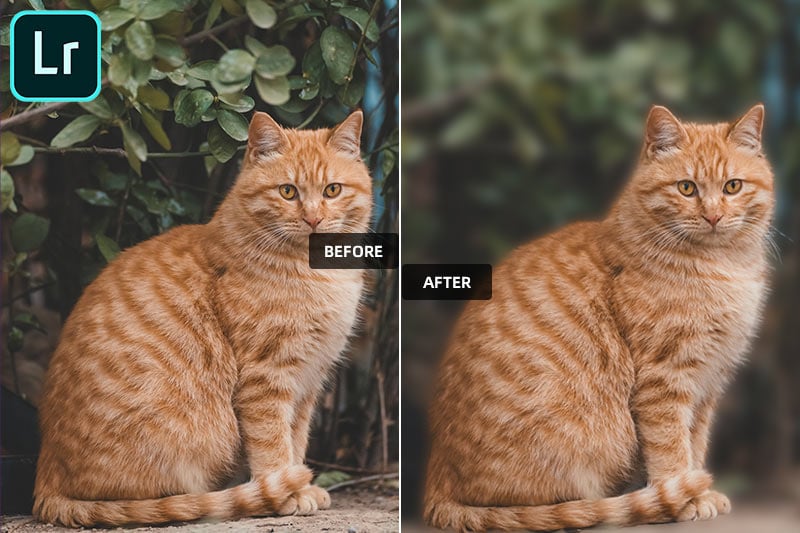
How to Blur Image Background with AVCLabs PhotoPro AI
Step 1: Download AVCLabs PhotoPro AI and Upload an Image
Install AVCLabs PhotoPro AI and launch it. Click the Browse button to upload the image that you want to edit, or drag and drop the file into the workplace directly.
Step 2: Select the Background
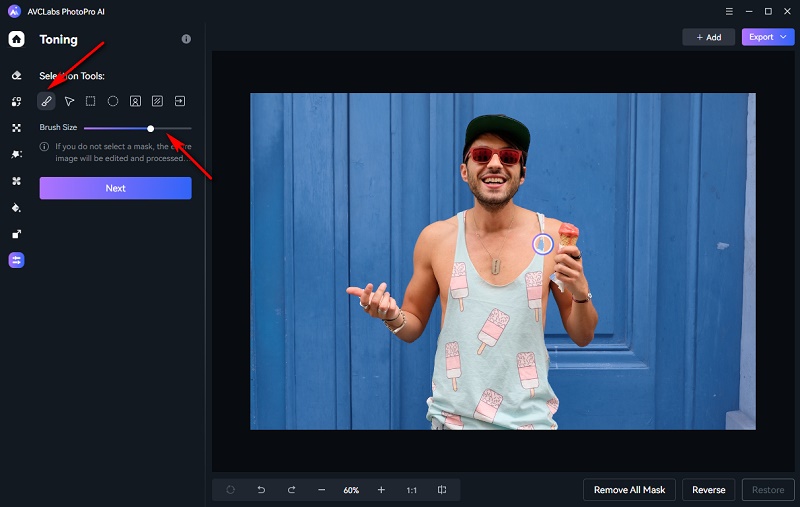
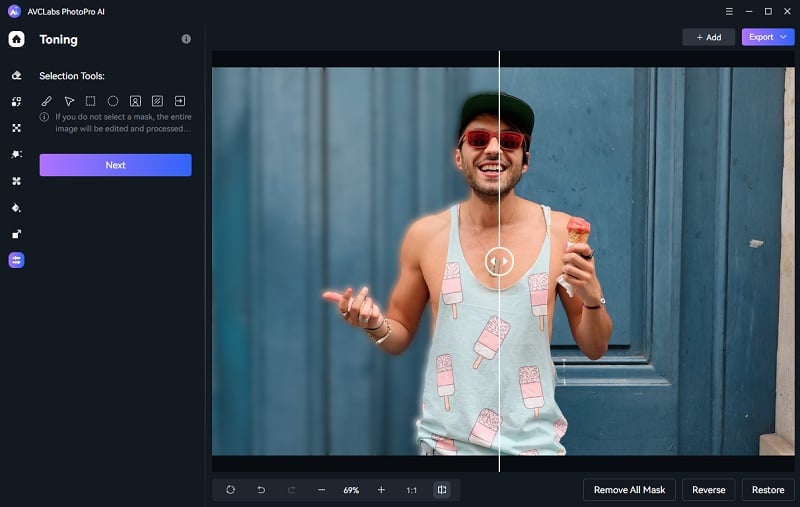
Click the Toning option first and you will see six selection tools. To blur the background of your image, especially if it has clear edges, click the Background Selection tool, and it will automatically cover the background.
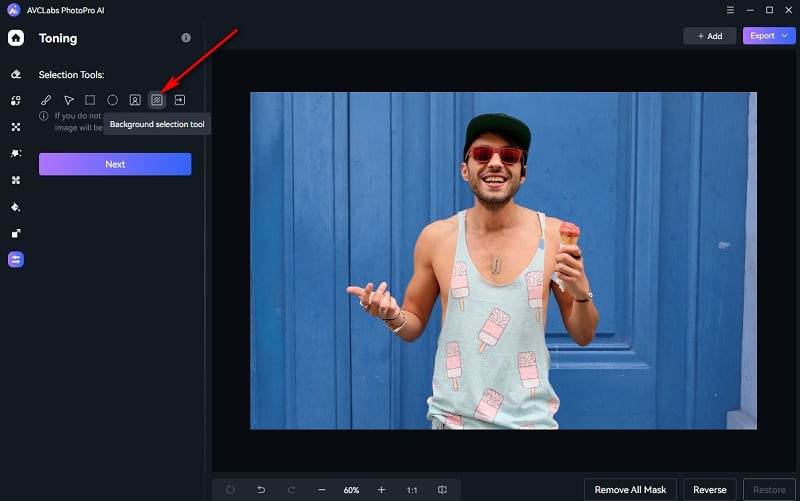
If there are parts that didn't get selected properly, you can use the brush tool to refine them. Left-click with the brush tool to select, and right-click to erase.
Step 3: Apply the Blur Effect
After selecting the desired part, click on "Next." You'll see the Blur slider under adjustment section– drag it to add the blur effect. The larger the value, the more obvious the blur effect
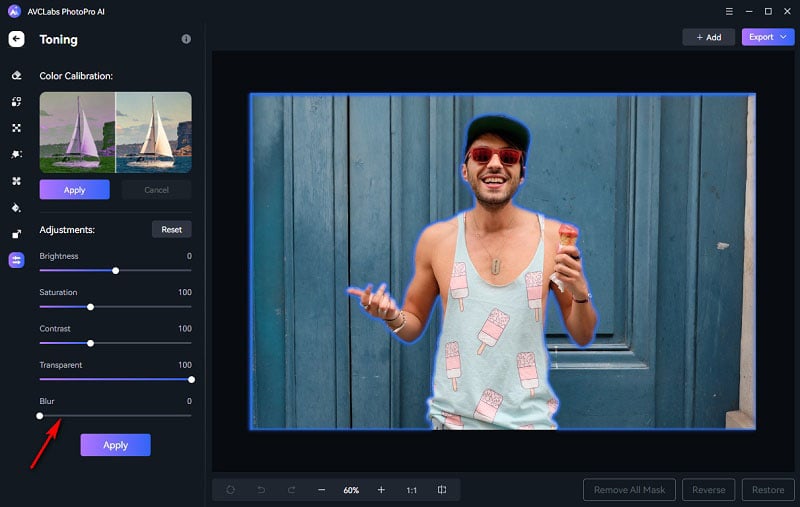
You can also manually adjust the image color, or apply color calibration to let AI automatically balance the color.
Step 4: Save the Image with a Blurred Background
Click the contrast button to preview the before and after effects. Once you're satisfied with the result, you can save the edited image. Choose from source formats, such as JPEG, JPG, PNG, and BMP. Additionally, you can export it as a mask for future use.
Video Tutorial: How to Blur Image Background with AVCLabs PhotoPro AI
Bonus: How to Blur Video Background with AI
Blurring the background in videos presents a greater challenge compared to images due to the dynamic nature of video content. However, thanks to AI technology, getting a blurred video background is now possible with minimal effort.
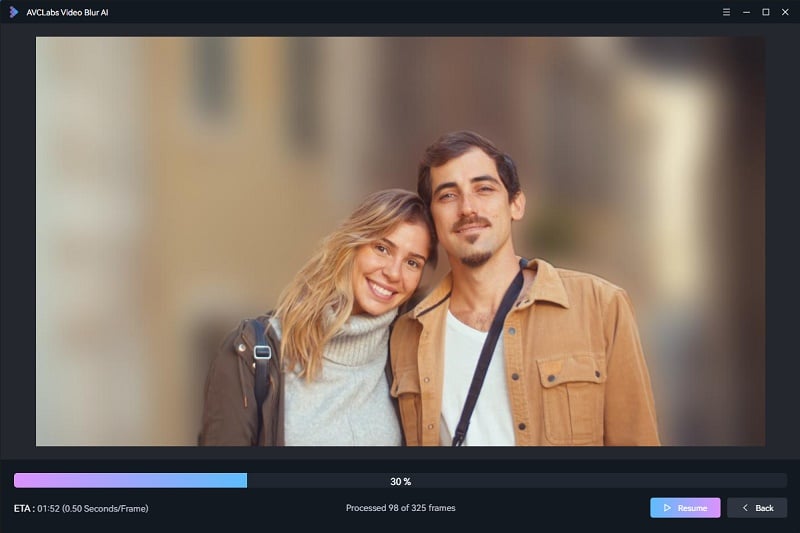
AVCLabs Video Blur AI introduces multiple video blurring options, including blurring the video background, foreground, faces, objects, and sensitive information. The software leverages advanced artificial intelligence algorithms to intelligently detect objects within video frames and apply precise blurring while leaving the rest of the scene untouched. The outcome is a seamless, softly blurred background that safeguards sensitive data.
Download and Try AVCLabs Video Blur AI for Free
Conclusion:
No matter which post-processing software is used to blur the background, it is difficult to perfectly replicate the complex optical properties of the camera lens. The ideal approach is to fine-tune shooting parameters to capture perfectly blurred background images. Of course, proficient use of post-processing software such as Lightroom and Photoshop to blur the background can also achieve a certain effect. For newcomers without extensive photo editing skills, an AI solution like AVCLabs PhotoPro AI presents a viable alternative. Blurring the background is a skill that can elevate your photography to new heights. By following this step-by-step guide, you’ve learned how to use various tools to create a visually stunning image with a captivating background blur. Choose the method that suits you best and try it out now.