How to Fix Grainy Photos: Step-by-Step Noise Reduction Guide
 Posted By: Sherry Johnson
- Category: Photo Enhancer Tips
- Updated On: May 30, 2026
Have you ever shot a photo that's full of grain because you shot in low light, used a high ISO setting, or simply because your phone camera wasn't good enough?
The good news is that there are many ways to fix grainy images - from free online image denoiser to advanced software like Photoshop and Lightroom, and AVCLabs Photo Enhancer AI, which restores clarity with a single click. This article will introduce these tools in detail and provide step-by-step instructions for reducing noise from photos and making your images appear clearer.
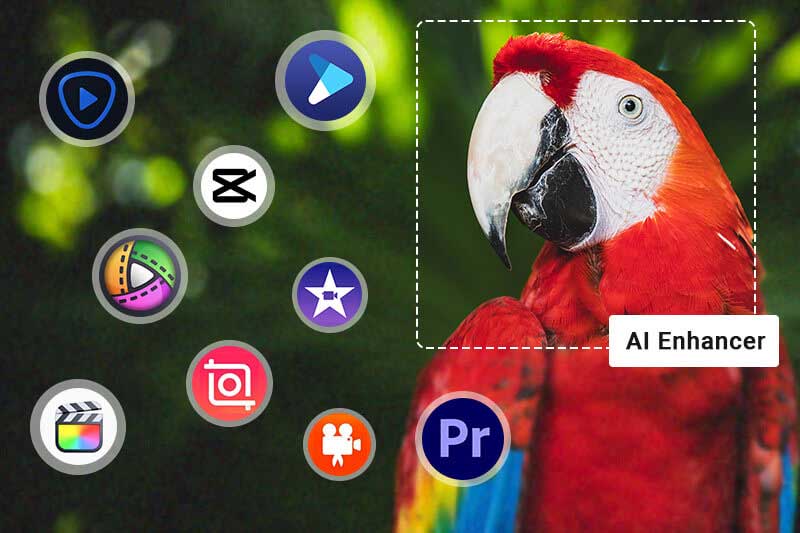
🔥Top Recommendation: AVCLabs Photo Enhancer AI
If you're looking for a fast and hassle-free way to fix grainy images, AVCLabs Photo Enhancer AI is worth trying first. Unlike manual tools that require multiple adjustments, this AI-powered software automatically analyzes your photo and removes noise while preserving details.

1. How to Fix Grainy Photos Online for Free?
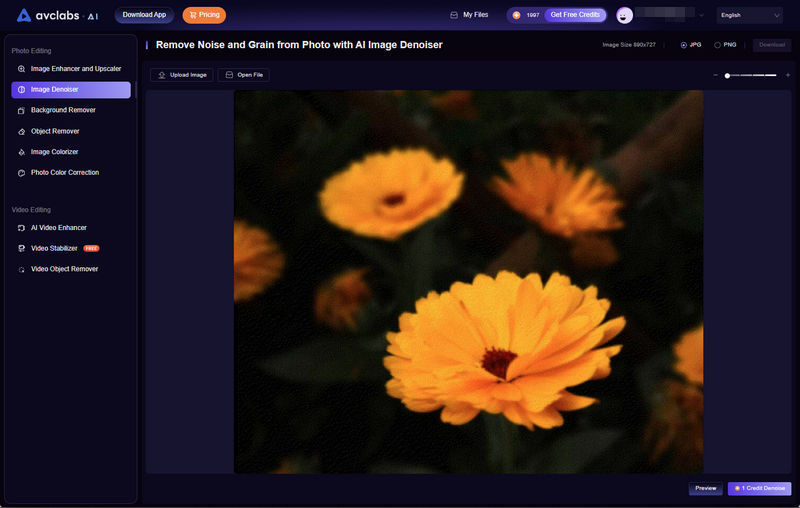
AVCLabs Online Image Denoiser is a free, web-based solution that can reduce grain from photo and smooth photo in just a few clicks without installing any software. It uses advanced AI algorithms to automatically analyze and fix grainy image while intelligently preserving detail for a clearer, more natural-looking image. It's suitable for various types of photography, including portraits, landscapes, and fashion shots.
Step 1 Go to the AVCLabs online tool website and select Image Denoiser tool.
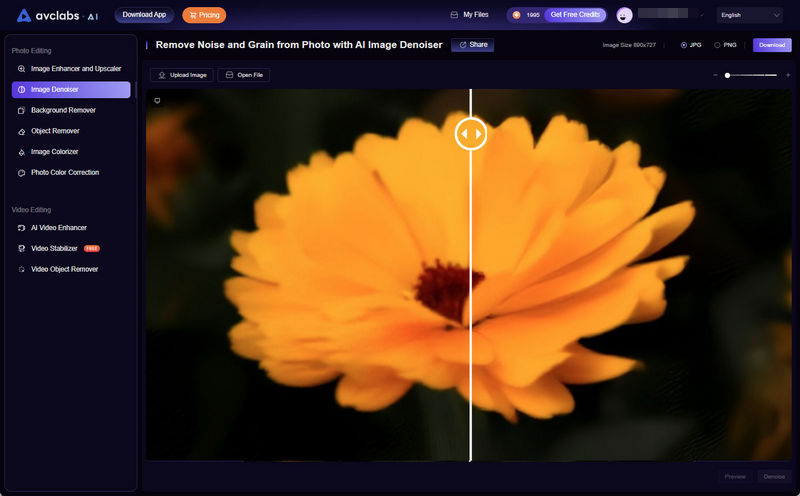
Step 2 Upload your grainy JPG, PNG, or WEBP image to the tool. Click the "Denoise" button in the lower-right corner and wait for the AI to automatically remove noise from photo.
Step 3 After processing is complete, click the "Download" button to save your clear, denoised image.
💡 Online photo noise reduction processing speed may be affected by your network conditions and server load. For users requiring faster processing, AVCLabs Photo Enhancer AI desktop software offers more powerful features and supports batch noise reduction.
2. How to Fix Grainy Photos in Photoshop?
Photoshop offers several powerful tools for reducing noise while preserving image detail. Below are 3 effective methods, each with its own unique advantages, to help you fix grainy pictures and restore clarity.
2.1 Use Camera Raw Filter - Most powerful and flexible method to fix grainy image in Photoshop
The latest Camera Raw 17 uses powerful AI-powered noise reduction to effectively remove grain from photo in Photoshop, leaving images cleaner, sharper, and richer in detail. More importantly, this processing is non-destructive, eliminating the need to create duplicate files, saving disk space, and allowing for adjustments at any time.
Step 1 Right-click the Layers panel and select Convert to Smart Object. This allows you to double-click the filter at any time to re-edit it, making it easy to denoise image.
Step 2 Find the Camera Raw filter under the Filters tab and then the Detail tab in the right panel to fix grainy images in Photoshop.
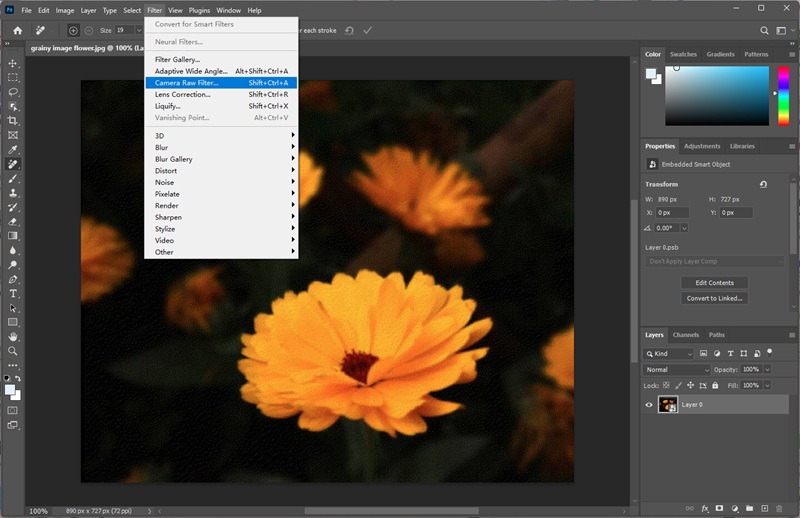
Step 3 Enable the Denoise feature and use the slider to set the intensity of the AI noise reduction. If the photo noise reduction result is still unsatisfactory, you can use options like Sharpening, Luminance, and Color for finer manual adjustments.
Step 4 Once you've made all adjustments and are satisfied, click the OK button at the bottom to apply the filter effect.
2.2 Use Reduce Noise Filter - Quick and straightforward, ideal for beginners and general photo noise reduction
The Reduce Noise filter is a Photoshop tool specifically designed for removing luminance and color noise, making it a versatile choice for users of all skill levels. It offers intuitive slider controls, ensuring you can easily fix grainy images in Photoshop.
Step 1 Open the image you want to remove grain from in Photoshop and duplicate the layer for a non-destructive operation.
Step 2 Go to the top menu: Filter > Noise > Reduce Noise.

Step 3 The Reduce Noise filter has two noise reduction modes. Basic mode is simple and fast, making it ideal for beginners or for most general noise reduction tasks. Advanced mode allows you to adjust the red, green, and blue channels individually, making it more suitable for professional users who need precise noise reduction.
- Strength: It controls the overall brightness noise reduction intensity. Higher values result in more pronounced noise reduction, but may also result in detail loss.
- Preserve Details: Protects fine details from being blurred while fixing grainy photo. This slider is a key balancing act between noise reduction effectiveness and detail preservation.
- Reduce Color Noise: Used to reduce color noise (random red, green, and blue speckles). Moderate increases can effectively reduce grain without significantly affecting detail, but excessive levels may cause color blending and distortion.
- Sharpen Details: Used to compensate for sharpness loss that may occur during noise reduction. However, excessively high values may reintroduce noise or counteract the noise reduction effect.
- Remove JPEG Artifact: Automatically detects and reduces these compression artifacts for a smoother image - ideal for repairing over-compressed JPEG photos.
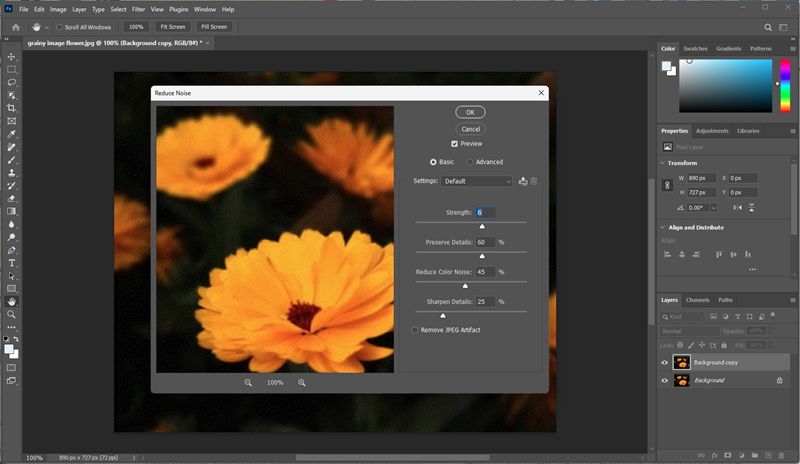
Step 4 Check the Preview box to view the changes as you fix your grainy photo in real-time, then click OK to apply the filter.
2.3 Use Smart Sharpen Filter - Best as a complementary tool for restoring clarity while controlling noise
The primary function of the Smart Sharpen filter is to enhance clarity, but it can also fix grainy photos through built-in noise reduction. It doesn't directly remove noise from photo, but it can serve as a supplementary tool to make the image sharper while making noise less noticeable.
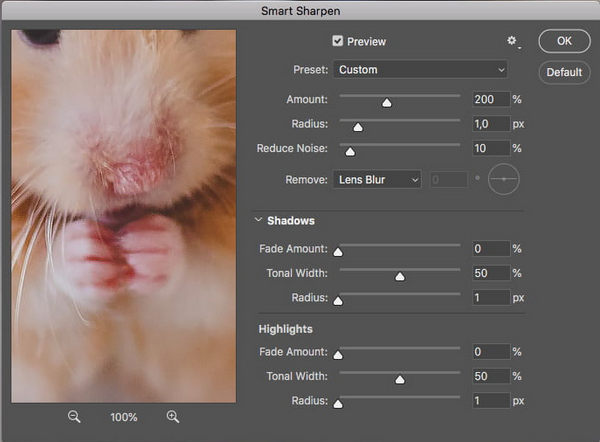
Step 1 Duplicate the image layer and select Filter > Sharpen > Smart Sharpen from the menu bar.
Step 2 Increase the Amount and keep the Radius low to sharpen edges, then moderately increase the Reduce Noise setting.
Step 3 Fine-tune the settings and preview the results to find the optimal effect for fixing grainy photos and click OK to apply the filter.
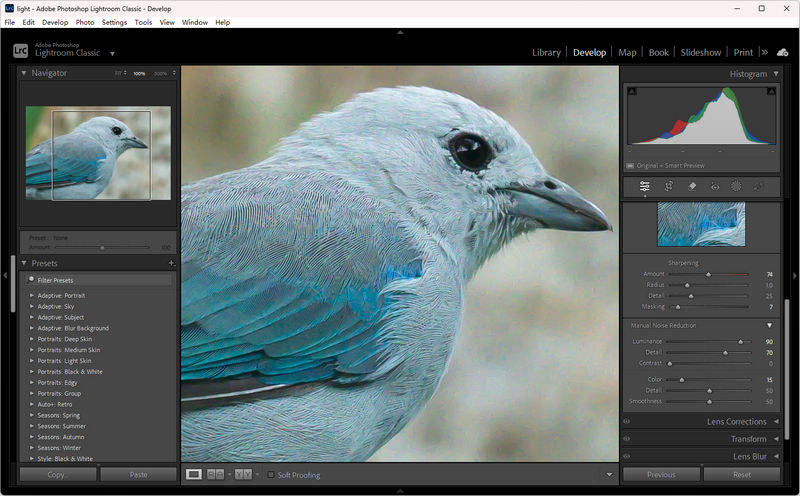
3. How to Fix Grainy Photos in LightRoom Classic?
Lightroom Classic, the go-to tool for professional photographers working with RAW files, offers two powerful, non-destructive methods to fix grainy pictures - from automated AI noise reduction to precise manual noise reduction.
3.1 Use AI Denoise Feature - Best for RAW photos with heavy noise
In Lightroom Classic 12.3, Adobe introduced the AI Denoise feature. Powered by deep learning models, it significantly reduces noise from photo while preserving the fine details and sharpness of the image. It currently supports RAW files from cameras using Bayer or X-Trans sensors.
Step 1 Import the RAW file photos that need noise reduction into the Library and switch to the Develop module.
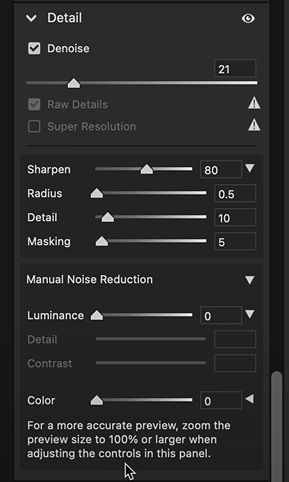
Step 2 Find the Detail tab in the right panel.
Step 3 Click the Denoise button and adjust the noise reduction intensity to fix grainy image in Lightroom. Please note that Denoise can now be applied non-destructively without creating a new DNG file. This will provide additional flexibility when editing, reduces the use of disk space as well as the number of files that we'll need to manage.
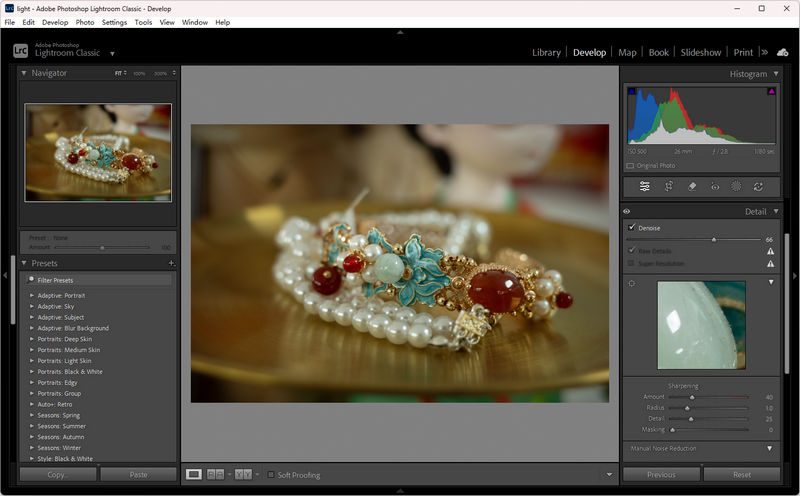
Step 4 After noise reduction, adjust the Sharpening Amount, Radius, Detail, and Masking settings to achieve optimal results. Masking is the most critical parameter, controlling where sharpening is applied. This is to avoid amplifying small noise particles remaining after noise reduction in smooth areas, ensuring a clear and clean image.
3.2 Use Manual Noise Reduction - Suitable for processing non-RAW files like JPEGs and TIFFs with minimal noise
Manual noise reduction is the most traditional and flexible noise reduction method for fixing grainy photos in Lightroom. Not only does it support all file formats, but it also allows for manual noise reduction of specific areas, avoiding unnecessary processing of already clean parts of the photo.
Step 1 In the Develop module, scroll down to the Details tab and expand the Manual Noise Reduction section.
Step 2 Address color noise first, then address luminance noise, and finally, use the sharpening tool to restore image detail as needed.
Try AVCLabs Photo Enhancer AI: Fix Grainy Photos Without Photoshop
AVCLabs Photo Enhancer AI is more than just a noise reduction tool—it's a comprehensive AI-powered photo enhancement software available for both Windows and Mac. Powered by a deep AI noise reduction model trained on massive amounts of data, it more intelligently distinguishes between image noise and real details. This means it can smooth out the grain while keeping skin texture, hair details, and edges sharp, without making the image look overly airbrushed or unnatural.
It fully utilizes your computer's local resources, delivering faster speed and more stable performance when fixing grainy photo. AVCLabs Photo Enhancer AI also supports one-click batch noise reduction for images, significantly improving work efficiency and making it particularly suitable for photographers and e-commerce users who demand the highest quality and efficiency.
Key Features of AVCLabs Photo Enhancer AI
- Make the blurred, low-quality photos to high-definition
- Upscale the image resolution without losing quality
- Automatically remove noise/grain from images
- Immediately improve your portrait photography
- Quickly colorize the old black&white images
How to Fix Grainy Images with AVCLabs Photo Enhancer AI?
Step 1: Upload Your Grainy Image
Launch AVCLabs Photo Enhancer AI and import one or more photos that you want to denoise or fix the grain in.
Step 2: Fix Grainy Image
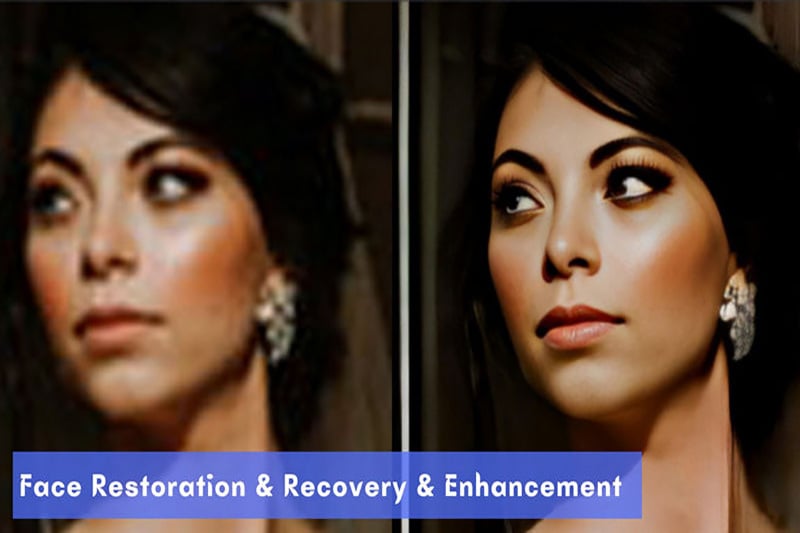
Find the AI Denoiser option under Function selection. If the image contains a face, you can also check the "Face Refinement" option to allow AI to intelligently refine and beautify facial details while reducing noise.
Step 3: Preview and Save Image
Click the Preview button to compare the before and after effects of noise reduction. Once confirmed, click Save All or Save Current in the lower-right corner. AVCLabs Photo Enhancer AI will automatically perform noise reduction on your photo and save the clear result to your computer.

FAQ About Fix Gariny Image
Can grainy / blurry photos be sharpened?
Yes. Grainy or blurry photos can be improved with tools like Photoshop, Lightroom, or AI-based software. Noise reduction helps smooth out grain, while sharpening restores detail. For the fastest results, AVCLabs Photo Enhancer AI can enhance clarity automatically with one click.
Can I use Lightroom instead of Photoshop to fix grainy photos?
Absolutely. Lightroom offers powerful noise reduction and sharpening tools, along with non-destructive editing capabilities, making it highly effective for fixing grainy photos in Lightroom. Its efficient batch processing makes it the go-to tool for photographers working with large numbers of high-ISO images.
However, for extremely severe grain problems, you may need to resort to Photoshop filter stacking or a third-party plug-in for the most detailed control and optimal results.
Conclusion
Now you've mastered all the noise reduction and sharpening techniques, from the online tool AVCLabs Free Image Denoiser to professional AI software for Photoshop, Lightroom, and AVCLabs Photo Enhancer AI. Among the many solutions for fixing grainy photos, AVCLabs Photo Enhancer AI is an excellent choice—especially if you want to avoid using complex software like Photoshop or time-consuming manual adjustments.